Showing posts with label Secret crafter challenge. Show all posts

Sunday, 12 June 2011

Dad - You're A Star!

This was such a great card to make! I've used some freebie paper I got probably a few years ago from a card magazine - I downloaded the file as I find that the actual giveaway in the magazine is a bit hard to use as the paper quality is not always the best.

The star is one of my own templates and I've used my Sizzix Round-A-Bout alphabet set for the Dad letters and Cuttlebug Baby Face alphabet for the You're A Star sentiment.

A bit of inking with black and a red inkpad and the card is complete!

It fits the following challenges:

Ladybug Crafts: It's All About The Males
Crafting For All Seasons: Father's Day
Ambers Cards and Crafts: Special Man
Paper Play: Fathers Day
Delightful Challenges: Fathers Day
Craft Us Crazy: Fathers Day
CRAFT Challenge: Fathers Day
Sew Many Challenges: Fathers Day
Fussy and Fancy: For A Male
Alphabet Challenge: F for Fathers Day
Secret Crafter: For A Male
One Stop Craft: Fathers Day
Sentimental Sunday's: Fathers Day


  • Papers: Free from a magazine a few years ago
  • Dies: Sizzix Round-A-Bout and Cuttlebug Baby Face

Thursday, 2 June 2011

O Christmas Tree!

Another Christmas card! I am determined to achieve my 100 target by November, so I'm slowly chipping away at it!

I've used a Kraft card blank with a doodled black line around the edge plus a row of Cosmic Shimmer gold dots (bit of bling!)

The twill ribbon is from my stash and it is so easy to work with as it can be creased so you know where to cut and stick!

The stamp is from Polkadoodles and I've coloured it with Promarkers. The card fits the following challenge:

Corrosive Challenge: Christmas (Tree!)
Secret Crafter Saturday Challenge: Clean and Simple
Incy Wincy: Nature

Moving Along With The Times: No Designer Paper

Sassy Studio Designs: No Patterned Paper

Southern Girls: Christmas

  • Stamp: Polkadoodles, coloured with Promarkers
  • Everything else: My stash

Monday, 28 February 2011

Sparkly Pink Cupcake

I just can't stop making these cupcake cards! This one is for the Secret Crafter Challenge which is:

Sweet Treats

The template is from Polkadoodles Paper Boutique Vol 3 and this is the pink version! Ribbon is from my stash and I've added glitter glue and glossy accents to the chocolate stars. The sentiment star is also included with the template and I've used the pre-printed one here.

The card stands up via a concertina band between the front and back; the ribbon fastens both sides together, so you have to undo it to view the message inside! Really lovely and quick card to make!

  • All paperbased elements: Polkadoodles Paper Boutique Vol 3
  • Everything else: My stash

Tuesday, 4 January 2011

Buttons and Bows

I did say that there would be a second wordbook coming along using the Girls and Boys papers from Funky Hand and here it is! This one is for the Secret Crafter Saturday Challenge which asks for:

Buttons and Bows

The papers are from Funky Hand - Girls and Boys download and I've used Wordart to print the letters. All the buttons, ribbons, eyelets and gems are from my stash, and I've made the hat pin by using a pearl headed pin and adding seed beads at the top and also the bottom (to stop any sharp surprises!)

I do like making these cards - fairly quick and easy to make but they look so good!

  • All papers: Girls and Boys download from Funky Hand
  • Everything else: My stash

Thursday, 16 September 2010

Spinning Around

A nice easy sketch this week from Secret Crafter challenge which fitted perfectly with an image that I had coloured with my Promarkers plus a little inking around the edges.
I got the image as part of the Design Team for The Digi Blog Hop and is from Digi Sparkle. I had an idea to make a sort of slider card as the image can be spun around! So she's either jumping for joy or doing a cartwheel!

I've used papers from Funky Daze from Funky Hand which I got out of my bit box. I've highlighted the Happy Birthday sentiment by using my Nesties as I didn't have any other sentiments that really went with the card. To be honest it took longer to make the slider spin thing than it did to make the card!

The ribbon and brads are from my stash. This Digi Sparkle image, plus the matching boy one are part of the blog candy available to win in The Digi Blog Hop, along with a number of other digital images from various artists.

  • Image: Digi Sparkle, coloured with Promarkers, from The Digi Blog Hop
  • Papers: Funky Daze from Funky Hand
  • Dies: Spellbinder Nestabilities
  • Everything else: My stash

Monday, 12 April 2010

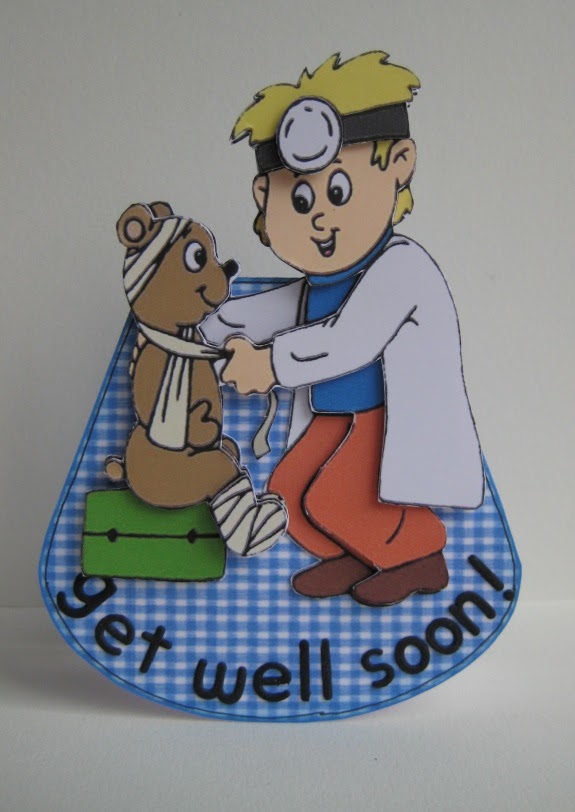
Little Doctor

I made this cute wobble card with a sheet purchased from CraftsUPrint a while ago because I thought it looked so cute and ideal for a poorly child. It's been decoupaged with foam pads and I've used my Cuttlebug Baby Face dies for the lettering around the base.

Plus a little bit of doodling and it is completed! It fits with the current Secret Crafter challenge which is:

Get Well

So I am entering it into the challenge! And I think I will send it to me as I am already suffering from dammed Hay Fever!!!!!! If this is the start of things to come then I'm not going to enjoy summer! I have to change the tablets to something different every year as the same thing never works two years in a row. And the only time I didn't suffer was when I was expecting the boys! It could just be an early blip. I hope!

  • All card elements: Sheet bought from CraftsUPrint
  • Sentiment: Cuttlebug Baby Face alphabet set

Thursday, 28 January 2010

Another New Wardrobe!

The Secret Crafter Saturday challenge is a colour theme with inspiration to be taken from this photo (wish my house was this tidy!!)

And I've made another expecting card! Well the stamp was out and it had been inked so it seemed rude not to use it! The colours in my card look a little washed out - however in real life they are not!

I've used papers from Funky Hand - these were part of a freebie to celebrate the launch of their monthly challenge, which I've inked and rounded the edges.

The image has been layered onto lime green post-it notes and grape pearlescent card. Again the image stamp is Inkadinkadoo and I've coloured it with watercolour paints to match the colour scheme. The ribbon, button and hat pin are from my stash - I've added extra beads to the hat pin.


Now I must remember to make lots of new baby cards with all these expectant mothers!

  • Backing papers: Funky Hand freebie
  • Image: Inkadinkadoo coloured with watercolour paints
  • Everything else: My stash


Friday, 16 October 2009

Autumn Angela

The Secret Crafter Saturday challenge is:

Autumn Colours

I'd been asked to make a word book Birthday card so decided to use the beautiful papers from Now That's Funky. I printed the letters out using Wordart - just resized them to fit all 6 on one sheet of A4 and then cut round them and added to the pages. Really easy to do! I'd printed the outline of the letters in a dark orange which didn't show up too well against the zingy papers, so went round the outline with a fine black pen.


All the bits and bobs that I've added to the card are from my stash. I've added a different coloured panel to the back of the last letter so a message can be written on it.
These are really lovely papers, and I think you just may be seeing more of them over the next few weeks!! I printed onto 220gsm off white card as the normal stuff I have is a bit too thin and wobbly!
  • Backing papers: Now That's Funky cd from Funky Hand
  • Everything else: My stash

Wednesday, 30 September 2009

Little Birdie

This is a quick card made for a little baby boy who has taken his time to appear!! And it's not like I didn't have enough notice, but I did forget to make a card, but remembered in time so here it is!

It also fits the Secret Crafter challenge this week which is:

Animal Antics

I know my birdie is not doing anything but sitting there, but it is an animal! I've run a piece of card through the d'vine swirls Cuttlebug embossing folder, inked and rounded all edges. The birdie is taken from a template from Candy Doodles and I've also used the print from Candy Doodles.
The ribbons are from my stash and so is the charm (one that I found that I'd forgotton about!) I've tied the ribbon in one of my one 'bow' efforts as I'd cut it too short to make a proper bow! I never learn!

  • Backing papers: Candy Doodles
  • Embossing: Cuttlebug d'vine swirl
  • Everything else: My stash

PS If the layout of this post is a bit odd - something went strange with Mr Blogger and I can't get it back!


    Thursday, 23 July 2009

    Spots & Stripes

    The Secret Crafter challenge this week is:

    Spots and Stripes

    I've made my own card blank from some lovely mottled / textured red card upon which I've layered a piece of stripy card - not sure where this originated from but I think it must have been a digital download because I've printed it off.

    I treated myself to some Spellbinders Nestabilities - been looking at them for a long time and decided to take the plunge. Once I'd decided which one to buy that is! Was a little tricky to use at first as I need another spacer mat or something in my Sizzix Original machine but managed to use the smaller dies with the small black Sizzlets spacer plate. So ok for now, but will need to get myself sorted if I want to use one of the larger nesties.


    The sentiment has been stamped with an acrylic Studio G stamp and I had to pick one that would fit on the shape! The ribbon is from my stash and the card candy is from Craftwork Cards.
    • Backing paper: Not sure
    • Dies: Spellbinders Nestabilities - Labels
    • Sentiment: Studio G acrylic stamp
    • Ribbon: From my stash
    • Card Candy: Craftwork Cards

    Monday, 29 June 2009

    Big Blooms

    The Secret Crafter challenge this week is:

    PRETTY PACKAGING
    We would like to see your gift bags, boxes or even recycling of packaging as long as it is pretty!


    I decided to recycle an old coffee jar that I found at work and turned it into a flower pot complete with matching flowers! The first two photos show the front and back views of the covered jar and the flowers - I've used virtually 4 sheets of Stackies flowers. The flowers have literally been cut out and stuck randomly with their petals ruffled up all over the jar.

    The flower stems are twisted lengths of thick wire so they stand up well enough. The flower heads are co-ordinating sheets of stackies which I have ruffled up the petals and simply layered or stacked them together. A little bit of doodling on some of the petals but that's all!

    To keep the wire stems in place, the centre of the flower has the wire poking through and I've freehand curled it to provide a bit of interest.

    And if you watch Create and Craft / Ideal World closely at 12noon on Wednesday 1 July, you just might see these!! Nikky is presenting her new cd - Sugar Birdies and I've sent her this creation as a sample! The flowers may have company - Lulu Ladybird may be amongst the blooms!


    • Flowers: Stackies
    • Jar: Recycled from Tesco!
    • Wire: From my stash


    Wednesday, 10 June 2009

    Very Blingy!

    The Secret Crafter Challenge this week is:

    Bling


    I made this card last week as a special commission for a returning customer and the brief was a Birthday Card for her Mum who has joined the Red Hat Society where they dress in purple with red hats or fascinators, and her nick name is Baroness Bling Bling! And I could add as much bling as I wanted - more the better!

    The little person and accessories have been cut with Sizzix dies, the dress is made from organza, seed beads and glitter glue. The silver vellum background has been Swiss Dotted, sentiment is computer generated and all the ribbon and gems are from my stash.


    I have been told that the little person looks just like the recipient, so I am pleased with my judgement!

    • Dies: Sizzix and Cuttlebug Swiss Dots
    • Everything else: From my stash

    Tuesday, 28 April 2009

    Looks Good Enough To Eat!

    The Secret Crafter challenge this week is for

    Shaped Cards

    And look what shape I found on the Patti Picklicious cd! I've actually re sized it as I thought it was a bit titchy so this is more or less A5 size.

    I've used a white gel pen to go round the edges and also inked them with brown and pink. The cupcake is also on the cd and I have simply added it to a thin strip of acetate, coloured it with watercolour pencils, inked and chalked it and then finally glitter glued it! And then layered it onto some of the little spotty paper.

    Card candy (which matched very perfectly!) from Craftwork Cards.

    Friday, 20 March 2009

    Have Your Cake And Eat It!

    The Secret Crafter Challenge for this week is:


    Have your cake and eat it!


    For the first time ever, I've actually printed directly onto the card stock - I've used Pink Petticoat Big Mini Dots download (had to trim the card a little for the margins). And I did say that I'd be doing the cupcakes again! Made them the same way as before, but this time cut, what I hope will look like, bites out of the cake (although husband said it look like a rat had gnawed them....)


    And I've added a co-ordinating strip of card to back the cupcakes onto and the obligatory brown satin ribbon.


    I was thinking of adding a sentiment underneath but couldn't decide on what. So will leave it blank until I reach that decision!

    • Card stock: Big Mini Dots download from Pink Petticoat
    • Backing papers: Huge Funky Love
    • Template: From Simply Cards and Papercrafts magazine (thanks to the person who pointed it out to me in the previous post!)
    • Ribbon: From my stash

    Friday, 20 February 2009

    Spring Has Sprung - Simply!

    The Secret Crafter challenge this week is:

    Spring Has Sprung!

    So, I got out my left over papers to see what yellows I had, and I found these - all I think are from It's Funky Too. So after a bit of faffing around with layering and when I was happy with what I had, I doodled a running stitch around the edges of the card and papers. The image is one sent to me by Anice as we did a Funky Hand DT image swop and its been coloured with watercolour pencils. I've slightly inked the edge of the image with a running out black ink pad and the wide grosgrain ribbon is from my stash.

    Yeah, and the lighting is the halogen kitchen lights again....

    • Backing papers: It's Funky Too
    • Image: Anita's Stamps and from Anice
    • Ribbon: From my stash (originally Blackburn market)

    Friday, 30 January 2009

    Birthday Bubbles with Scruff!

    The Secret Crafter challenge this week is another recipe:


    1, 2, 3
    1 image
    2 papers
    3 embellishments


    And I've used the same image of Scruff again (cos it is fab!) - and it was pre-coloured - saving time and giving me the inspiration for the backing paper colours! The backing papers were also a freebie and were part of the Mily Designs download, which I still cannot remember where I got them from - aren't the colours just fantastic?! All edges have been inked in black and I've rounded the edges.


    The sentiment was handwritten but was supposed to be computer generated but the thing would not play nicely and work so the handwriting it had to be! The three embellishments bit of the recipe are covered by the fab flower (thanks Jozza!) and the two Queen & Co holder things and the pearlescent brads.

    Sorry that the main image is at a slight angle - it is straight in real life, honest!

    • Backing papers: Don't know but the download said Mily Designs
    • Image: Scruff
    • Flower: From Jozza
    • Other Bits: Queen & Co pink things and Dovecraft pearl brads

    Friday, 16 January 2009

    Funky Daze Gift Box - It's Not A Card!

    Sometimes when I see a challenge I know exactly what I'm going to make, right down to the smallest detail. And then sometimes I've not got a clue and it takes me a few days of thinking to work it all out. This was the former - I knew straight away!

    For the Secret Crafter Saturday Challenge, it was to:

    Make anything but A CARD!

    So I made a gift bag! It was based upon this tutorial! I printed the card on both sides so the inside of the box is interesting too! Also, the flowers have been cut from double sided printed card - all from Funky Daze from Funky Hand.


    I've used some wavy scissors (well, the scissors are not wavy, they just cut a wavy line!) to shape the top and used my eyelet setter to make the holes for the ribbon.

    I've inked the edges of the flowers with either blue ink (tiny freebie ink pad) or Chestnut Whispers, pinched the petals together, glued the centres and then added tiny centres also cut from the same backing paper. I told you that you'd see more of the Cuttlebug flowers!
    I'm sending this gift bag to Anice as she is on telly on 27 January with a live premier of Funky Daze (further details in my sidebar) so if its shown you can say you saw it here first!
    • Backing paper: Funky Daze from Funky Hand
    • Template: Mine - tutorial here
    • Ribbon: From my stash
    • Dies: Cuttlebug Flowers

    Thursday, 8 January 2009

    I Am Loving This Paper!

    This is a new challenge site for me and I thought I'd give it a go! So the challenge this week on the Secret Crafter Saturday Challenge is the following sketch:
    Which I have flipped round, only because I'd bought some cute wire and bead house embellishments and wanted to use them! This was quite a quick card to make, generally because it all fell together very easily and I really like it! But I think that has a lot to do with the backing paper - Simply Elegant (again). I've hardly trimmed anything off the 6x6 paper to fit on the cardstock as I didn't want to lose the fab flourish. The embellishment has been mounted to a square of white card which I have chalked to tone it down. This has then been layered onto some lovely A7 sized notepaper (I bought one of the pads for each of my DT members as I liked it so much!) then distressed, inked and chalked the edges.

    I've also used the notepaper for the sentiment, which has been handwritten and I've added some little white highlights here and there. If you look closely, you will still be able to see the pencil lines I originally drew. Then forgot to rub out! And the jute string was added to complete the sketch.
    • Backing paper: Simply Elegant 6 x 6
    • Embellishment: Card Candy brand bought from Mad About Cards
    • Notepaper: A7 notepad
    • Sentiment: Handwritten