As promised earlier in the week, here is my watercolouring tutorial. Or at least, how I watercolour!
Please don't think that this is how you should watercolour, this is simply how I do it! There are no set ways of how it should be done, but this is how I am most comfortable, so the moral of the tale is to practice and find a style that you like and are happy with!

You will need: Watercolour paints, clean water in suitable pot, fine paintbrush, some stamped images (which have used an archival safe ink suitable for watercolouring such as Whispers or Stazon etc). Stamp the images onto either watercolour card / paper or thick cardstock - anything unsuitable will warp with water. Also shown are watercolour pencils as this tutorial shows the image finished with watercolour pencils. You will also need a tissue (not to wipe away your tears if it gets really bad, but for blotting!)
 Firstly, I selected an image which has quite a lot of large areas to colour. This is a good idea if you are not used to this technique! Start by blocking some watered down colour onto the dress.
 The add some darker colour over the top. If you have too much water on your brush you can always use the tissue to soak it up.
Gradually build up the colour on the dress by adding more colour onto your brush and not as much water. If you find the colour too intense, simply add a little water over the area - this will disperse the colour.

Add deeper colours too - such as browns or purples to give depth and shadows - around the edges. Take care to leave some 'highlighted areas' which will have less colour.

Give the main part of the dress a little time to dry or at least check that the colour will not bleed onto this next area. Colour the sleeve and top of dress by adding a thin layer of colour as this will be built up the same way as the dress.

The sleeve and main part of the dress is now completed. More darker colour can be added at a later stage if you want, but for now this area will be quite wet and the colours may run or bleed where you don't want them to!
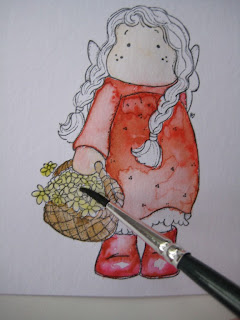
 Next select an area which does not have too much corresponding area with the bit you have just coloured. The basket is ideal for this. Again, the same technique has been used - start off with a thin layer of colour and then build upon it.
Next I gave the face a very thin wash of colour. However, the top of the dress was not quite dry and the red bled. This is easily rectified by using the tissue edge to soak up the excess colour, and by blotting.

Only a small amount of colour from the dress has remained on her face, but I think that looks ok!

The boots can now be coloured however, this time I have started off with a deeper colour for the shadows and will add water to lighten it for the highlights.

I find this way particularly useful when colouring smaller areas although it can be difficult to control the water if you have too much on the brush.

Next step to give the basket of flowers a light wash of colour as I will fill them with more colour with the watercolour pencils at the end - they are just too fiddly to paint!
Now the hair can be coloured as the dress will probably be quite dry by now and the colour has less chance to bleed into unwanted areas.
 Start by adding a darker colour and follow the contours of the hair - don't do straight lines as it will look odd!
 Colour has been added to the frilled hem on the dress. There is some bleeding from the dress, but this looks fine.
 Orange has been added over the top but it looks to heavy in colour
 So it is blotted away with a tissue edge
 Once the colour on the hair has sufficiently dried, a lighter colour has been added. Also colour on the sleeve and mitten has been built up further as I felt it was too light.
The final image (below) shows that I have also added colour to the flowers and depth to other areas (basket and boots) with the watercolour pencils. I don't like to use black watercolour paint as this can make the colour look very flat and murky - it is much easier to use pencils in darker tones.

All I need to do now is glitter the wings, add some rosy cheeks with chalk and add it to a card!
Hope this has been useful for you!
Very nice work! Thank you for the tips:)
ReplyDeleteThanks for these tip Ruth..I haven't got a clue when it comes to painting..I think I might ask for some watercolour paints for my birthday now!!
ReplyDeleteAnice xx
Oh wow, oh wow, thank you, thank you! I was wondering how all you talented ladies managed to get such perfection in your colouring in!!!
ReplyDeleteThat is not to say that mine will end up anything like this, but I am so going to give it ago!
xxxx
Looks good - you might have inspired me to go and find my watercolours now :)
ReplyDeleteThis looks great Ruth! I want some watercolours now :-)
ReplyDeletexx
very interesting Ruth, thanks for sharing
ReplyDeleteAllisonX
very interesting Ruth, thanks for sharing
ReplyDeleteAllisonX
Brill! Thanks, Ruth!! :o)
ReplyDeletehugs,
Chris xx
Sweet and lovely and nicely paced for the beginner who wants to see exactly how things are done. You are so patient taking each pic - very clear! Alison
ReplyDelete