Thursday 30 October 2008

Nope, Not A Christmas Card, But Ribbon is Involved!

The Friday Sketchers challenge this week is:


And here is my interpretation. I was struggling to get any of my Christmas images and stamps to fit properly without it looking ridiculous, so decided to do a new baby card instead! Not got a clue what or where the yellow and white gingham backing paper came from - just discovered it in my stash. The cute giraffe is a Cuttlebug die and I've had it quite a while but never really used it, which is very tardy of me as it is a lovely die and cuts nice and crisp. I've chalked it to give a bit of definition and added a wobbly eye.


The dotty strips are translucent vellum run through the Swiss Dots Cuttlebug embossing folder, and the scallop edges have been made with my other new Martha Stewart punch (really sorry, but the names of them just escape me and I didn't write them down!) All edges have been lightly inked in black (yes it is still running out!) and the ribbon bow is silky stain ribbon from Blackburn market.


  • Backing papers: Not got a clue but have used translucent vellum
  • Dies: Cuttlebug giraffe from an animal set, and Cuttlebug Swiss Dots embossing folder
  • Ribbon: Blackburn market


Wednesday 29 October 2008

Stamp Something Challenge - For the Birds

This weeks Stamp Something challenge is:

Something For the Birds.

Make a project using bird images; any types, sizes, shapes, and colors.


How could I not resist a little Christmas Robin?! Although he does look like he has a bit of an attitude! Backing paper is from Funky Hand - Funky Christmas Time download and also the square behind the image.

Stamped image is part of the Cute n Cuddly clear set from Anita, which I have coloured with watercolour paints and a dash of silver glitter glue. I've used two gold eyelets to attach the image and the ribbon (wide gold organza). All edges have been inked lightly in black.

  • Backing paper: Funky Christmas Time from Funky Hand
  • Image: Anitas Stamp Set - Cute n Cuddly coloured with watercolour paints and a little glitter glue
  • Ribbon: From my stash
  • Eyelets: Dovecraft

Oh Christmas Tree! You Are So Fluffy!

The Tag You're It Challenge for the week is:

... to incorporate a Christmas tree somewhere onto your tag.

Any interpretation you like - it could be a bog standard Christmas tree or you could think outside the box and create something new, traditional or modern, the choice is yours.


Right, so this is a bog standard Christmas tree but I've fluffed it up with some funky wool (guess where from?!) by wrapping it round the die cut shape. It's all attached to a metallic tag which was in the sale at Matalan along with other sizes and colours. The grossgrain ribbon on the base of the tree is the same as the top, and I've added two gold star brads to complete it.

Although you can't see it, where I have cut the ribbon, it has been edged with gold glitter glue. Mainly to stop it from fraying.

  • Tag: Christmas Gift tags from Matalan (last year)
  • Die Cut: Sizzix Christmas Tree
  • Fibres: Funky wool from Blackburn market
  • Ribbon: From my stash (originally Blackburn market)
  • Brads: Making Memories

Tuesday 28 October 2008

Shhhhhh! You Ain't Seen This!!

Carol is back from her holiday with another great sketch, and the sketch is:

The boys have been invited to a 5th Birthday party in November (Lynsey you can stop reading here or feign surprise when you do see the card!) and I wanted to make a princess themed card. And as I do like a sketch challenge, I decided to get the card made early and used Carol's challenge sketch.

The pink stitched paper is from my camper van swop from Allie (I actually already had some of this, in pink, green and black but never used them - think I will now as it is lovely thick handmade paper!) the fairy is made from various Sizzix dies with Quickutz tiara and wand. The net on the dress is actually a remnant from a friends wedding veil (she knew I'd be able to use it!) and the name has been cut using the Cuttlebug Baby Face alphabet.

The translucent vellum has been cut using my new Martha Stewart punch (I am liking it very much!), ribbon from my stash, and the metal heart / star embellishment is actually a posh paperclip from Paperchase.
Happy Birthday Anya when it does eventually arrive - the boys are already asking when is it time to go to the party!!
  • Backing paper: From my Camper Van Diva swop partner
  • Dies: Sizzix and Quickutz. Martha Stewart border punch
  • Ribbon: From my stash
  • Embellishments: Paperclip from paperchase, gems from my stash

Allie - The Camper Van Diva Swop!

As promised, here are pics from my recent Camper Van Diva swop partner - Allie. And look at all this that she sent me! The Volks World magazine is actually a folder, and inside were all the papers and borders (I've already used some of the pink stitched ones!)

And there was an altered booklet with a fab stamped image of a camper van (I very nearly bought the same stamp myself!) Lots of pages inside for me to scribble notes, and at the back....

.. is a stitched pocket with 3 camper can tags and a very funky space saving ruler (it folds in half!) with camper van prints on it!

All this was inside a draw string - well, actually ribbon (and very lovely ribbon too!) bag with a cute fabric camper van in the bottom corner. Also inside the bag was a lovely camper van notelet book and an envelope with all manner of bits and bobs, including flowers, dome stickers, gems, ribbon (she knows me too well!) brads and charms!!


But wrapped separately (all the packages were wrapped in brown paper and had pictures of camper vans on them!) was this beautiful framed image - beautifully cut and stitched. Isn't it fabulous?!


No wonder the boys thought it was my Birthday!
A huge thank you to Allie!! Now go and visit her blog - she is a very talented lady!!
And a big thank you to JB*JB for organising such a fab swop!


Monday 27 October 2008

Sketches by Tamara

Sketches by Tamara has another sketch for this week (obviously!) which is:


And this is my interpretation. This is actually the second card I made for this challenge - just was not happy with the first one so made another! And totally different too! I've got loads and loads of scrap jean material and had some lying around so made 3 flowers with the shapes on the Cuttlebug Baby Face alphabet set, added three buttons with some pale blue organza ribbon tied through the centres. The tag has been hand cut with a daisy eyelet centre (thanks Kath!) and tied with the same organza ribbon. Sentiment stamped with the Studio G mini alphabet with blue ink. Don't know where the backing paper came from - I've had it a long time but I've used my new Martha Stewart punch on the edge. All edges have been lightly inked with black (its lightly because the pad is running out!)


  • Backing paper: Not got a clue!
  • Dies: Daisy flower from the Cuttlebug Baby Face alphabet
  • Punches: Martha Stewart
  • Sentiment: Stamped with mini wooden alphabet stamp from Studio G
  • Ribbon & buttons: From my stash

DCM Challenge - Forever Autumn

The DCM Challenge this week is:

Forever Autumn.

I decided on this one after hearing the Justin Haywood song of the same name playing on the radio. I couldn’t get it out of my mind and kept singing it as I was working.

So now I’m daring you to make a card that depicts Autumn.

It can be an Autumn scene or it can be something completely different but using a palette of Autumn colours……the choice is yours!

I must be getting old as I've never heard of Justin Haywood nor the song, but still joined in on the challenge!

The backing papers are all scraps I had lying around and I've used my new Martha Stewart punch for the edges. A ribbon threading punch has been used across the top of the card to give it some balance, the flowers have been layered with brad centres to keep them together. And the Tilda image is the one I used on my watercolouring tutorial a few days ago - I've glittered her wings to complete it.


I don't usually use this colour combination but it is a colour I love (have a very bright fluffy jumper in orange (and I mean orange!) that I used to wear years ago but can't bear to let it go!)

  • Backing papers: Scraps of plain card and paper from my stash
  • Image: Tilda, coloured with watercolour paints and pencils
  • Flowers: Prima Esprit orange and yellow flowers
  • Ribbon: From my stash
  • Brads: Making Memories

Saturday 25 October 2008

Recent WIP - Camper Van Diva Swop

Now all can be revealed as my Camper Van Diva swop partner has received my package! I did show some sneaky photos a while ago, but here are the finished articles:


Each card has an oval tag cut from a 1970 road map sheet which was inside an old car magazine. I've punched a larger hole through which I've threaded ribbon in complementary colours (I did say I'd use ribbon somewhere!) and I've inked the edges of the tags and also the edges of the cards. The sentiments have been stamped with my trusty mini Studio G wooden alphabet stamp and as you can see - the lettering is not as wonky these days!

All the backing papers are downloads from various collections from Vicki's blog which I have printed to fit a 13.5cm square card. The camper van die cuts I've had for ages (I knew I'd be able to put them to good use one day!) and I've layered different colours to achieve the finished result. All have frosted windows added (translucent vellum) and silver gel line highlights.

And I'm so pleased you like them Allie! My package arrived yesterday which opened with aid from Samuel and Jacob who thought it was my Birthday and kept giving me hugs! They weren't that far wrong as it did feel like my Birthday as there was so much to unwrap! It was far too dark to take decent photos but I will do over the weekend and will share in the next few days. Thank you Allie!
  • Backing papers: All from Vicki's blog, vintage road map background from an old magazine
  • Die Cuts: From my stash
  • Sentiment: Mini wooden Studio G alphabet stamp set
  • Ribbon: From my stash


Friday 24 October 2008

Watercolouring Tutorial - Or How I Do It!

As promised earlier in the week, here is my watercolouring tutorial. Or at least, how I watercolour!
Please don't think that this is how you should watercolour, this is simply how I do it! There are no set ways of how it should be done, but this is how I am most comfortable, so the moral of the tale is to practice and find a style that you like and are happy with!


You will need: Watercolour paints, clean water in suitable pot, fine paintbrush, some stamped images (which have used an archival safe ink suitable for watercolouring such as Whispers or Stazon etc). Stamp the images onto either watercolour card / paper or thick cardstock - anything unsuitable will warp with water. Also shown are watercolour pencils as this tutorial shows the image finished with watercolour pencils. You will also need a tissue (not to wipe away your tears if it gets really bad, but for blotting!)

Firstly, I selected an image which has quite a lot of large areas to colour. This is a good idea if you are not used to this technique! Start by blocking some watered down colour onto the dress.

The add some darker colour over the top. If you have too much water on your brush you can always use the tissue to soak it up.


Gradually build up the colour on the dress by adding more colour onto your brush and not as much water. If you find the colour too intense, simply add a little water over the area - this will disperse the colour.

Add deeper colours too - such as browns or purples to give depth and shadows - around the edges. Take care to leave some 'highlighted areas' which will have less colour.

Give the main part of the dress a little time to dry or at least check that the colour will not bleed onto this next area. Colour the sleeve and top of dress by adding a thin layer of colour as this will be built up the same way as the dress.

The sleeve and main part of the dress is now completed. More darker colour can be added at a later stage if you want, but for now this area will be quite wet and the colours may run or bleed where you don't want them to!
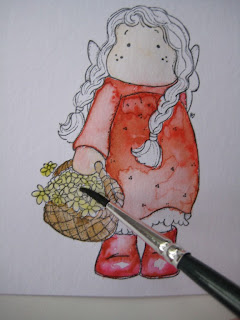
Next select an area which does not have too much corresponding area with the bit you have just coloured. The basket is ideal for this. Again, the same technique has been used - start off with a thin layer of colour and then build upon it.

Next I gave the face a very thin wash of colour. However, the top of the dress was not quite dry and the red bled. This is easily rectified by using the tissue edge to soak up the excess colour, and by blotting.


Only a small amount of colour from the dress has remained on her face, but I think that looks ok!

The boots can now be coloured however, this time I have started off with a deeper colour for the shadows and will add water to lighten it for the highlights.
I find this way particularly useful when colouring smaller areas although it can be difficult to control the water if you have too much on the brush.
Next step to give the basket of flowers a light wash of colour as I will fill them with more colour with the watercolour pencils at the end - they are just too fiddly to paint!
Now the hair can be coloured as the dress will probably be quite dry by now and the colour has less chance to bleed into unwanted areas.

Start by adding a darker colour and follow the contours of the hair - don't do straight lines as it will look odd!

Colour has been added to the frilled hem on the dress. There is some bleeding from the dress, but this looks fine.

Orange has been added over the top but it looks to heavy in colour

So it is blotted away with a tissue edge

Once the colour on the hair has sufficiently dried, a lighter colour has been added. Also colour on the sleeve and mitten has been built up further as I felt it was too light.
The final image (below) shows that I have also added colour to the flowers and depth to other areas (basket and boots) with the watercolour pencils. I don't like to use black watercolour paint as this can make the colour look very flat and murky - it is much easier to use pencils in darker tones.


All I need to do now is glitter the wings, add some rosy cheeks with chalk and add it to a card!

Hope this has been useful for you!

An Award!

I've been awarded this from June:

It's really cheered me up after being snowed under with work this week! Thank you June! I won't pass it on as its always hard to pick a certain number of blogs when there are so many fab ones out there!

Thursday 23 October 2008

I'm Still Here....

.... just really busy with the day job and a lot of card orders.

Hopefully I shall be able to see light at the end of the tunnel early next week and shall be back on the challenge band waggon!

And I think it will be an artifical light as I don't see much daylight these days!

Tuesday 21 October 2008

Fluffy Jumper and Charity Shops!

A recently commissioned card! Lynsey asked me to make a card for her Mum's forthcoming Birthday and gave me a few ideas of her likes and habits. And this is what I made!

She likes charity shopping and shoes and a lager (although I've made it a pint of frothy beer!) every now and again. You can just about make out the glasses I've made from wire although the fluffy jumper hides them a little! The backing papers are Dovecraft Amethyst 6 x 6 pad with transparent vellum layer which has been embossed with Swiss Dots Cuttlebug folder. Card and backing paper edges have been inked in pink.


Happy Birthday Lynsey's Mum!

  • Backing papers: Dovecraft 6 x 6 Amethyst papers and transparent vellum
  • Dies: Sizzix Original Red dies which have been customised once cut
  • Embossing: Cuttlebug Swiss Dots
  • Ribbon: From my stash

Sunday 19 October 2008

Having A Gay Old Time!

My Funky Hand DT mate Allison had been asked to make a 40th Birthday Card with a difference - it had to be 'funny and very gay'. So she asked me to make 2 little people characters, and this is what I came up with:


Apologies for the quality of my photos - it was dark when I took them as I was so keen to get them in the post to her!

And here they are on her card! The whips were not attached so you are not going mad - they have moved!


You can see her card on her blog here.

Saturday 18 October 2008

Boys & Girls Papers - Tilda Challenge #40

The Tilda Challenge this week is a sketch:

And its no secret that I like sketches! I've used the Craft4Charity cd Boys and Girls backing paper from Funky Hand along with a watercoloured Tilda image which has been enhanced with watercolour pencils too. I couldn't really get the image as a circle as it didn't look right with too much 'white' around it, so its a sort of egg shape. The background of the image has been lightly chalked in pink, and the edges have been dotted in gold gel pen.
So sorry for the wonky card - I think I was so pleased I was taking the photo in daylight I forgot to square upto it!


The little bulldog clip on the side is from Jozza and I've added some organza ribbon (which started life as a very chavvy hairband!) and some fibres.

  • Backing papers: Boys and Girls collection from the Craft4Charity cd
  • Image: Tilda, coloured with watercolour paints and pencils
  • Other Bits: Bulldog clip from Jozza, everything else from my stash
PS: Watch this space for a watercolour tutorial - or at least 'how I do it' tutorial on watercolours!