Showing posts with label Photo paper direct. Show all posts

Friday, 24 August 2012

Get Funky - Anything Goes (with a Funky Hand Product)

It's my turn to provide some inspiration for this months challenge:

Anything Goes with Funky Hand Products

Please remember that you can make ANYTHING you like as long as you've used a Funky Hand product within your creation.  If you've not got anything, then you can snag the freebie that Anice offers each month which fits in with the challenge theme.

The winner gets to choose a Funky Hand download!

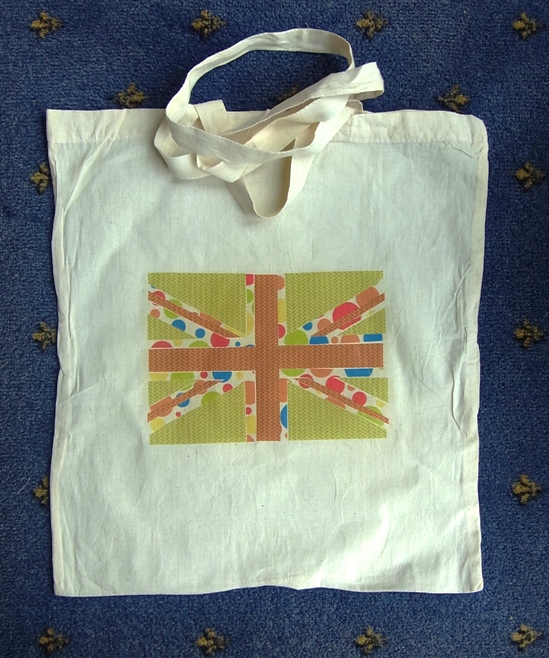
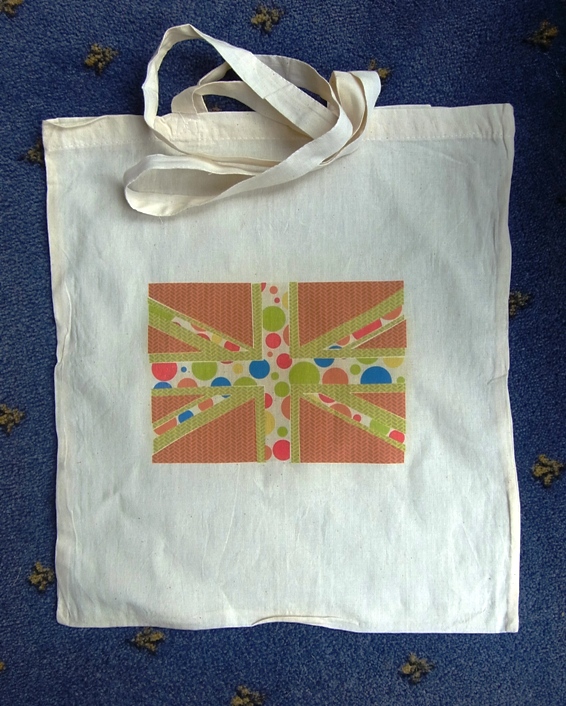
I've made something a little different!  I've used papers from Wishes and Kisses and printed them directly onto some photo transfer paper, cut them up using a Union Jack Template and created this:


It's a double sided canvas bag with a Funky Union Jack design!  The size of the Union Jack is A5 so I printed 3 different patterned papers onto the T-shirt Transfer Paper from Photo Paper Direct, cut them down to A5 and then used a Union Jack template (google is good!) to cut them out (I layered the three sheets together and took my time!)

I laid out the three papers and swopped elements over - the third one I made as a bag for myself!  A hot iron and a flat surface - worktop - and it was finished fairly quickly!  I bought the canvas bags from ebay.

Good luck with the challenge - and don't forget to use a FUNKY HAND PRODUCT!

I'd like to enter the following challenges:

DL.ART challenge:  Use Fabric
Moving Along With The Times:  Anything But Square
Paper Crafting Journey:  Anything Goes
Shelly's Images:  Colour Inspiration
Little Red Wagon:  Upcycle
Stampin Royalty:  Fabric
Sarah Hurley Challenges:  Alter Something

  • Papers:  Wishes and Kisses cd from Funky Hand
  • Cotton Bag:  Ebay
  • T-shirt Transfer Paper:  Photo Paper Direct

Sunday, 21 November 2010

Ironing For A Good Cause

Here is pictorial proof that I do attempt some ironing every now and again! The boys with their spotty dotty t-shirts that I made them for Children In Need day on Friday.

There were 22 coloured spots on each side of the t-shirts - total of 88 ish spots that I hand cut out and ironed onto the t-shirts (Primark 2 for £1.50) on Thursday evening.


Iron on t-shirt transfer kit from Photo Paper Direct. Hope you like their forced smiles after they'd spent a hard day at school!

Sunday, 30 May 2010

T-shirt Transfer Tutorial

Here is the t-shirt transfer tutorial I promised! I did try and get it all ready before we went on holiday last weekend but despite spending over an hour trying to sort out the photos, Mr Blogger was just not playing and either kept loosing the photos or putting weird code in their place! Hopefully, this one will work!

The t-shirt transfer paper was generously sent to me by Photo Paper Direct who asked me to test the product and blog about it! And because I enjoyed making the first t-shirt I decided to turn the second t-shirt into a tutorial!

To begin, take a sheet of the t-shirt transfer paper. It comes in a pack of A4 and you can buy 20 sheets for around £8 (the budget pack is cheaper!) I used a kids plain white t-shirt that I pre-washed (bought 2 from Primark for less than £2). You will also need felt-tips or another colouring medium - do not use Promarkers as these take the surface off the paper. Copics are probably the same. Also, a sheet of greaseproof paper, a domestic iron, a surface that will withstand your iron on the hottest setting (do not use the ironing board!) and of course a digital image!

I used the sweet dino image from Simple Doodles (I'd previously asked permission to use it), decided on the best size and within Word I flipped the image so that when it was ironed onto the t-shirt it would be the correct way round - very important if using wording!

When I came to print the image onto the transfer paper, I selected the correct setting, however I didn't use this for my first t-shirt - I simply printed it as normal and it worked fine!

Here is the dino waiting to be coloured!

These are the felt-tips I used to colour my image - bought from Tesco for around £2.50.

And here, I've started to colour the base colour of the dino. I selected a pale colour to begin with and then built up the depth afterwards. Take care not to 'scrub' at the image as the surface will disintegrate.
I didn't leave enough time for the different colours to dry, so I experienced some 'bleeding' with the red. But I quite like the effect!

Once the image has been coloured cut it out leaving a fine border around the image - if you leave a wide border it will be more noticable once the image has been ironed onto the t-shirt.


Place the image coloured side down onto the t-shirt where you want it to be. You may want to use a small peice of sellotape to keep it in place if its easier. Apologies for the photo being the wrong way!
Now set your iron to its hottest setting and once upto temperture iron the image onto the t-shirt by using small round motions ensuring the whole of the image is covered. Do this for around 2 minutes and the backing paper will turn brown.

Leave the image to cool completely - you have enough time for a cup of tea and a hob nob! Once completely cool, carefully peel the backing paper from the image. Take care to peel it away in one full peice otherwise you may damage the image underneath.

If you prefer your transfer to be shiny then you can finish at this point and simply leave the t-shirt for 24 hours before washing it inside out.

However, if you want the image to appear matt, then place the sheet of greaseproof paper over the image and iron it, again on the hottest setting for around 30 seconds. Whilst the paper is still hot, peel it away.

The image underneath is now matt finish.

Leave it all to cool and wash the t-shirt inside out 24 hours later. It can either be tumble dried or left to dry naturally.

And here you have the finished t-shirt modelled by Jacob! He was looking most pleased as I had just bribed him with ice cream and chocolate sauce - after the photo shoot of course!!


If you want to use a pre coloured digital image then the same steps will be followed just without the colouring. I am really impressed as to how easy the t-shirt transfer paper was to use and I have a feeling that I will be buying a pack of the paper as I have more ideas on how to use it! If you want to use it on canvas bags, then Photo Paper Direct also sell them!

From start to finish, the whole process took around 2 and a half hours although I staggered it over 2 days. Please remember to ask permission from the digital artist before their image is used.

Thank you to Photo Paper Direct for sending me the paper to use and for asking me to try one of their products (I feel like I really have made it in the blogging and crafting world!) and also to Trish for allowing me to use her very cute dino!
Saturday, 22 May 2010

Simple Doodles Challenge 18 - Anything But a Card

It's time for another great Simple Doodles Challenge and this time I've set the challenge!! Which is:

Anything But A Card

A while ago I was contacted by a representative from Photo Paper Direct asking me if I would test and review some of their products. I was sent a sample of magnetic photo paper, sticker sheets and also T-shirt Transfer sheets. So far I've only used the T-shirt transfer sheets and here is what I made!

Apologies for the gappy toothy child but I needed a model! The sheet was really easy to use - I simply printed off the digital image I wanted (remembering to flip it to mirror image) and then coloured it with felt tips. I did try and use Promarkers but the surface of the sheet disintegrated.

After I'd finished colouring I cut around the image leaving a thin border. I then ironed this flat onto the t-shirt until the iron icon changed to brown.

Once it had cooled down I peeled off the backing sheet and then re-ironed it with a sheet of greaseproof paper between the iron and t-shirt. Left it for 24 hours and then washed it, inside out, and then popped it in the tumble drier.

Easy peasy!!


As you can see, the colours are really vibrant on the image! So not only have I managed to use the iron (on two separate occasions) I've also created friction between the boys as they are now fighting over who has the t-shirt!

So check back over the weekend as I plan to use the second sheet I was sent to make another t-shirt transfer and this time I'll blog it as a step by step tutorial. Edited to add - the tutorial will follow next weekend as Mr Blogger has really messed up my pictures and I'm on the verge of going on holiday and have not got enough time to sort it out!!

You can buy the packs of t-shirt transfer paper for just under £8 for 20 A4 sheets, and their service is fantastic!

Back to the challenge!! If you want to enter and need some inspiration, head over to the Simple Doodles Challenge blog - you have until 3 June to enter - good luck!

  • T-shirt: Primark for two t-shirts
  • Image transfer paper: Photo Paper Direct, coloured with felt-tips