Showing posts with label felt tips. Show all posts

Sunday, 30 May 2010

T-shirt Transfer Tutorial

Here is the t-shirt transfer tutorial I promised! I did try and get it all ready before we went on holiday last weekend but despite spending over an hour trying to sort out the photos, Mr Blogger was just not playing and either kept loosing the photos or putting weird code in their place! Hopefully, this one will work!

The t-shirt transfer paper was generously sent to me by Photo Paper Direct who asked me to test the product and blog about it! And because I enjoyed making the first t-shirt I decided to turn the second t-shirt into a tutorial!

To begin, take a sheet of the t-shirt transfer paper. It comes in a pack of A4 and you can buy 20 sheets for around £8 (the budget pack is cheaper!) I used a kids plain white t-shirt that I pre-washed (bought 2 from Primark for less than £2). You will also need felt-tips or another colouring medium - do not use Promarkers as these take the surface off the paper. Copics are probably the same. Also, a sheet of greaseproof paper, a domestic iron, a surface that will withstand your iron on the hottest setting (do not use the ironing board!) and of course a digital image!

I used the sweet dino image from Simple Doodles (I'd previously asked permission to use it), decided on the best size and within Word I flipped the image so that when it was ironed onto the t-shirt it would be the correct way round - very important if using wording!

When I came to print the image onto the transfer paper, I selected the correct setting, however I didn't use this for my first t-shirt - I simply printed it as normal and it worked fine!

Here is the dino waiting to be coloured!

These are the felt-tips I used to colour my image - bought from Tesco for around £2.50.

And here, I've started to colour the base colour of the dino. I selected a pale colour to begin with and then built up the depth afterwards. Take care not to 'scrub' at the image as the surface will disintegrate.
I didn't leave enough time for the different colours to dry, so I experienced some 'bleeding' with the red. But I quite like the effect!

Once the image has been coloured cut it out leaving a fine border around the image - if you leave a wide border it will be more noticable once the image has been ironed onto the t-shirt.


Place the image coloured side down onto the t-shirt where you want it to be. You may want to use a small peice of sellotape to keep it in place if its easier. Apologies for the photo being the wrong way!
Now set your iron to its hottest setting and once upto temperture iron the image onto the t-shirt by using small round motions ensuring the whole of the image is covered. Do this for around 2 minutes and the backing paper will turn brown.

Leave the image to cool completely - you have enough time for a cup of tea and a hob nob! Once completely cool, carefully peel the backing paper from the image. Take care to peel it away in one full peice otherwise you may damage the image underneath.

If you prefer your transfer to be shiny then you can finish at this point and simply leave the t-shirt for 24 hours before washing it inside out.

However, if you want the image to appear matt, then place the sheet of greaseproof paper over the image and iron it, again on the hottest setting for around 30 seconds. Whilst the paper is still hot, peel it away.

The image underneath is now matt finish.

Leave it all to cool and wash the t-shirt inside out 24 hours later. It can either be tumble dried or left to dry naturally.

And here you have the finished t-shirt modelled by Jacob! He was looking most pleased as I had just bribed him with ice cream and chocolate sauce - after the photo shoot of course!!


If you want to use a pre coloured digital image then the same steps will be followed just without the colouring. I am really impressed as to how easy the t-shirt transfer paper was to use and I have a feeling that I will be buying a pack of the paper as I have more ideas on how to use it! If you want to use it on canvas bags, then Photo Paper Direct also sell them!

From start to finish, the whole process took around 2 and a half hours although I staggered it over 2 days. Please remember to ask permission from the digital artist before their image is used.

Thank you to Photo Paper Direct for sending me the paper to use and for asking me to try one of their products (I feel like I really have made it in the blogging and crafting world!) and also to Trish for allowing me to use her very cute dino!

Saturday, 22 May 2010

Simple Doodles Challenge 18 - Anything But a Card

It's time for another great Simple Doodles Challenge and this time I've set the challenge!! Which is:

Anything But A Card

A while ago I was contacted by a representative from Photo Paper Direct asking me if I would test and review some of their products. I was sent a sample of magnetic photo paper, sticker sheets and also T-shirt Transfer sheets. So far I've only used the T-shirt transfer sheets and here is what I made!

Apologies for the gappy toothy child but I needed a model! The sheet was really easy to use - I simply printed off the digital image I wanted (remembering to flip it to mirror image) and then coloured it with felt tips. I did try and use Promarkers but the surface of the sheet disintegrated.

After I'd finished colouring I cut around the image leaving a thin border. I then ironed this flat onto the t-shirt until the iron icon changed to brown.

Once it had cooled down I peeled off the backing sheet and then re-ironed it with a sheet of greaseproof paper between the iron and t-shirt. Left it for 24 hours and then washed it, inside out, and then popped it in the tumble drier.

Easy peasy!!


As you can see, the colours are really vibrant on the image! So not only have I managed to use the iron (on two separate occasions) I've also created friction between the boys as they are now fighting over who has the t-shirt!

So check back over the weekend as I plan to use the second sheet I was sent to make another t-shirt transfer and this time I'll blog it as a step by step tutorial. Edited to add - the tutorial will follow next weekend as Mr Blogger has really messed up my pictures and I'm on the verge of going on holiday and have not got enough time to sort it out!!

You can buy the packs of t-shirt transfer paper for just under £8 for 20 A4 sheets, and their service is fantastic!

Back to the challenge!! If you want to enter and need some inspiration, head over to the Simple Doodles Challenge blog - you have until 3 June to enter - good luck!

  • T-shirt: Primark for two t-shirts
  • Image transfer paper: Photo Paper Direct, coloured with felt-tips

Saturday, 27 March 2010

Warning! It's Very Yellow!

It's my last time as Guest Designer over on the Simple Doodles challenge and I've really enjoyed my time and the warmth and generosity of the team - so thank you!

The new challenge for the coming fortnight is:

Layers

I've used the very cute little duck freebie image, coloured him with felt tips and then layered him onto bright yellow card from the Scrap Store and an off cut of white from my stash.

I've used a Nesties die to do the cutting and a Cuttlebug embossing folder for the texture. The orange ribbon is also from the Scrap Store. A little bit of doodling around the edges and the card is complete!

Hope you are able to join in with the challenge - you can use any digi image you want although there are lots of freebies to be found on the Simple Doodles blog!

  • Image: Freebie digital image from Simple Doodles, coloured with felt tips
  • Dies: Nestabilities and Cuttlebug embossing folder
  • Everything else: My stash

Friday, 25 September 2009

Polkadoodle Challenge 19 - Digi Colouring

It's Friday again, so it's another Polkadoodle Challenge! This is my last week of setting the Design Team challenges and I hope you've enjoyed them as much as me!

This week, I challenged the team to:

Colour a Digital Image

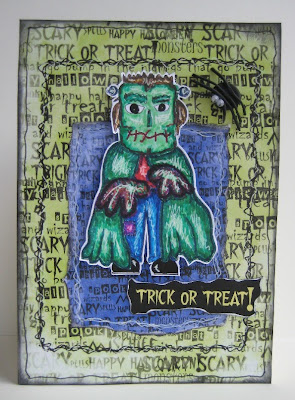
Now, they could use any image of Polly or Jack, and I choose the Halloween download as I really like the papers that come with it! There are two tutorials to accompany these two cards that I made - the Polly card uses watercolour pencils, and Jack has been coloured with good old felt tips!

A little bit of inking here and there and some tearing of paper and it all looks more spooky! The fimo spiders are left over from a previous challenge and I think I should make some more for next year!


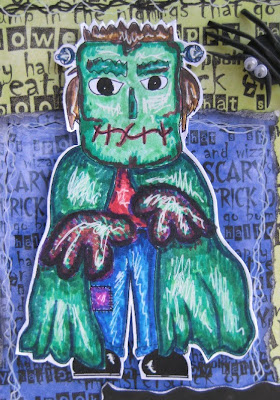
For the card with Frankenstein Jack, I've used felt tips and a white gel pen to give highlights. More doodling on this card and inking and it's finished!


Hope you're able to join in with this challenge - it's open until Sunday 4 October 12noon - go to the challenge post to enter your creation!
Good luck!
  • All backing papers and sentiments: Polkadoodle Halloween Download
  • Images: Polkadoodle Halloween Download, coloured with watercolour pencils and felt tips

Tutorial - Digi Colouring with Felt Tips

Here is a tutorial to accompany this weeks challenge. There will be another tutorial published just after this one which uses a different medium to colour a digital image.

My equipment is very basic! These are the watercolour pencils (24) that I use, and also the brush felt tips (30). I use the brush felt tips as the hard nibbed ones tend to 'scuff' the paper and are not as easy to blend with the different shades.

My two images that I'm colouring - Jack and Polly Polkadoodle from the Halloween download.

I've started off with Jack and the felt tips. By using a pale blue felt tip, I've coloured his jeans. This is now my base colour upon which I will add darker colours for shadowing.

I've then 'dotted' darker shades of blue on top of the initial block of colour - this is now providing shadows and form and it also helps to stop some of the hard lines that you get when using felt tips as they don't blend too well, but with this technique, it's not quite as noticeable.


Once the jeans are completed, I started on Jack's cape. Again, I added the lightest green I wanted as my base colour.

And slowly built up the shadows - the paler green stays as the highlights.


Once I'm happy with the cape, I then start on other smaller areas - I've coloured his t-shirt and started on his creepy gloves. Again, I've used the same techniques.

I've started to add different colours such as purple, blues and reds to build up more definition and to extend my colour range.

Next the hair and mask are coloured.

And for extra highlights, I've used a white gel pen and loosely but carefully scribbled over the top of the felt pen where I want highlights. This provides more definition.

I had a little helper whilst I was colouring the two images - Samuel was on his school holidays and sat with me and coloured his own Halloween Jack with his felt tips! Even though I've enlarged the image to fit an A4 sheet, there is no loss of quality - you can make the image as small or as large as you wish!

And this is the card I made with the image - I cut around Jack leaving a fine white border and layered him onto papers from the Halloween download. A bit of inking and doodling and he is complete! Plus the wobbly eyed fimo spider, made by me, of course!

The second tutorial on digital image colouring follows this post. Hope you enjoyed this one, and go and re-discover felt tips (these were half price in Tesco's - £1.25!)

Thursday, 23 July 2009

Poorly Dragon!

Another challenge - another sketch! And another Dustin Pike image too! This is the Sketch Saturday challenge:


I've used another dragon from Dustin Pike and again its been coloured with felt tips (but this time no highlighting - see - I can live without my white gel pen!) and layered onto Funky Daze backing papers.

All the papers are actually off cuts from a previous project - I do like it when that happens! I've handwritten the sentiment and added three card candy dots too.


All edges have been inked with an almost running out blue inkpad. But there is still life in it yet! These images are just so fab! I love them!!!!!!

Tuesday, 21 July 2009

Boo!

The ABC Challenge this week is:

W is for Windows

And because I treated myself to the bargain of all bargains (oh yes!) last week as Dustin Pike had a mega sale I am feeling the need to use his images a lot. Maybe not so far this week, but there will be more - I promise!

And because I found the fab £1.25 (half price) brush felt tips in Tesco last week and I am liking the effect they have (and also rediscovering decent felt tips and shading) I needed to use them!


So, I resized this image from Dustin Pike, printed it onto decent card stock and then coloured it in with felt tips, a little bit of watercolour pencils over the top and then a smattering of white gel pen over the top for extra highlights. I also used the pen for doodling a border around the edges of the card and for writing the sentiment.

The black card is from my stash.


And that's it! The claws actually hang over the edges of the card a little. Only because I cut the card too small. Me and measuring are not always on the same number......
  • Cardstock: My stash
  • Image: Dustin Pike, coloured with felt tips, watercolour pencils and white gel highlighter