Be warned - this post is a little picture heavy!!
 What you will need:
 1 sheet of printed A4 card (not too thick otherwise it won't fold too well - I have used 200gsm), a ruler, scissors, pencil, ribbon to decorate the top of the box and also to act as a tie on the top, double sided tape, glue, eraser (both not shown - sorry!) eyelets and setting tool. The eyelets and setting tool are optional as you can use an ordinary hole punch instead.
Time allowed from start to finish: 30 minutes plus glue drying time for the ribbon
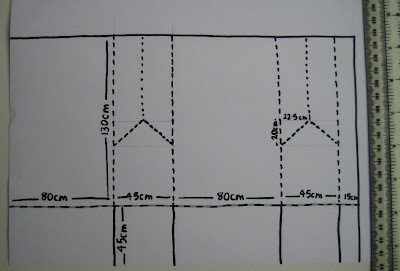
Here are the measurements for the box - you should be able to click on the photo for a larger view. The solid lines are for cutting and the dashed lines are for folding. All measurements are shown in centimeters and the box can be scaled up to make a larger one if you want.

Detail on the gusset for the sides of the box.

Using the scorer, score along all the dotted lines as these will be the folds. You can use a pair of scissors to do this if you don't have a scorer but just don't press too hard or you'll end up cutting the card! By doing this step, the card is a lot easier to fold and it saves getting wonky lines too.
 Next, cut and fold on the appropriate lines. Don't worry too much about the gusset folds as it is easier to do these properly when the box is made - this step just helps! Any pencil lines can be rubbed out at this stage if you wish.
 Measure and mark where you want the eyelets to go on the two larger panels, so that you can close the box once its made up. If you don't have an eyelet setter, you can use an ordinary hole punch - just take your time when lining it up! It's difficult to get the eyelets to completely close when using one thickness of card, so you may want to layer the card either on the front or reverse just go give the eyelets stability and to stop them spinning round.

Now the eyelets are set.
 Using the double sided tape (or if you are brave glue - but allow for drying time!) add pieces as I have done in the picture above.
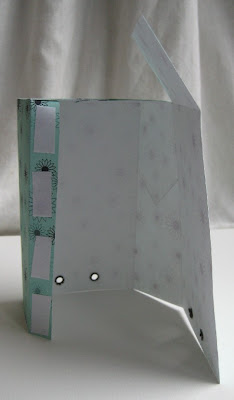 I found it easiest to close the bottom of the box first by layering the smaller flaps underneath the larger one. Now stick the sides of the box together and leave the final bottom flap free.
 Put double sided tape around the last bottom flap and bring the box upright to stick to the tape - this way you have more control over what sticks where and sufficient pressure is applied to make the tape stick.
 Now your box is looking like, well, a box! Don't feel bad about trimming any overhangs - it will finish your project off!

Gently squeeze in the gusset sides of the box - you will now be glad you scored these earlier! And hey presto! It looks almost finished!
 I've used black ric rac to edge the top of the box but you can leave it plain or edge it in what ever you want.
 This is how the inside of the box looks. Maybe I should have used double sided card? But you can see how the sides join together.
 I've added green organza ribbon through the eyelets so it all ties together plus two scallop edged tags on which I've written my sentiment. But you can add what ever you like!
 And you can put in what ever you want! This one held some chocolates as a thank you!

Hope this was easy to follow and would love to hear how you got on making your own box!
- Backing paper: Minty Madness download from Funky Hand
- Ribbon: From my stash
 The photo above is Samuel dressed as a devil for Halloween at nursery. I'd made the cape (with a stand up detachable collar and detachable devil tail) as I had plenty of time on my hands with just having Jacob about 7 weeks before. The chicken pox had just about run its course on him - the little devil had been totally covered and never scratched once!
 Didn't realise the irony of Samuel's displeasure of dressing them matching for bedtime until after the photo was developed.
 The days before he moved! England had won the Rugby World Cup and my mum had knitted him a jumper to wear whilst they went through the stages.
 One of my favourite photos of him - all chubby and lovely!
 This one was taken at a party. Samuel was very sick about 1 minute after I'd taken the photo. Nothing unusual as he does have a tendency to be sick at the drop of a hat!
 Watermouth Castle - our first visit there.
 Boxing Day 2004. I knew I was expecting Jacob although nothing actually confirmed.
 And here is Samuel holding his not quite a day old brother. Jacob is actually yawning and not screaming!


